

Create a private ServiceM8 Add-on with AI
Build and test a private ServiceM8 Add-on with an AI coding assistant, using Codex and Addon Kit in a plain-English walkthrough.
Use an AI coding assistant to build an Add-on for your business. Describe what you want it to do, let the assistant prepare the code, then connect your ServiceM8 account and test the result.
You do not need a separate ServiceM8 Developer Account or a public Add-on Store listing to build an Add-on for your own account.
This walkthrough uses Codex and ServiceM8 Addon Kit version 1.1.0. The screenshots show the ChatGPT desktop app on a Mac. Codex can run the toolkit commands for you, so you normally do not need to type commands into a separate Terminal app or install a code editor. The screenshots illustrate different stages across several sessions, rather than one uninterrupted run.
Our example allocates new, unassigned jobs to John in the Morning allocation window. You can use the same process to describe a different idea. Codex should check which ServiceM8 capabilities it needs before building it.
Before you start
You will need:
- An AI coding assistant that can work with files and run the toolkit, such as Codex or Claude Code.
- Node.js, which runs ServiceM8 Addon Kit. Installation is covered below.
- A ServiceM8 test account with API access, and a person authorized to grant the requested account access.
Start with a test account: deploying an automation can activate it immediately and allow it to respond to real events.
Prefer Claude? You can follow the same approach using Claude Code in the Code tab in Claude Desktop. Select a folder on your computer and use the prompt below. Node.js is still required for ServiceM8 Addon Kit.
1. Open Codex
Install the ChatGPT desktop app and sign in. Open the ChatGPT dropdown in the top-left corner and select Codex.
Codex will work with your project files and run the development commands. Use this desktop workflow for the steps below; an ordinary browser chat does not provide the same local project setup.
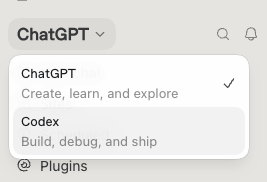
Select Codex from the ChatGPT dropdown.
2. Install Node.js
Open the official Node.js download page and choose the LTS release. Addon Kit 1.1.0 requires Node.js 22 or later; Node.js 24 LTS is suitable for this walkthrough.
Download the installer for your computer:
- Mac: choose macOS Installer (.pkg).
- Windows: choose the Windows Installer (.msi) option.
The download page may also display terminal commands. For this walkthrough, use the installer button in the prebuilt download section.

On a Mac, download the macOS Installer (.pkg).
Open the downloaded installer and follow its instructions. It installs Node.js and npm, the package manager used to install Addon Kit. Restart the ChatGPT desktop app afterward so Codex can detect the installation.
If Node.js is already installed, Codex can check whether its version is suitable before you install anything else.
3. Create a project and describe your idea
Create a folder on your computer for your Add-on files. In Codex, open Projects and choose to create a project.
In the Create project dialog:
- Give the project a name, such as Default Allocation.
- Under Source folders, choose Add a folder on this computer and click Add.
- Select the folder you created, then click Create project.
The project name organizes your conversations. The attached folder is where Codex will save the Add-on files. Keep that folder for future changes.
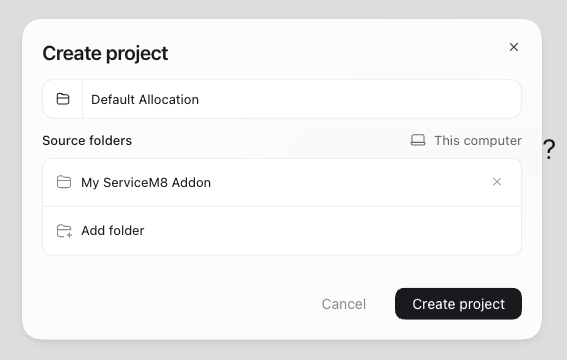
Create a project and attach the folder where your Add-on files will be saved.
Start a chat in the project. Copy the following prompt and replace the final line with your own idea:
Please help me build a private ServiceM8 add-on using https://developer.servicem8.com/docs/addon-kit.

I'm not a developer, so explain what I need to do in plain English. Ask before deploying or changing any account data.

My idea is: [insert idea here]
For example: “I want all new jobs to be allocated to John, in the Morning allocation window.”
Answer Codex's questions before it builds the Add-on. For this example, it should establish which John, which date to allocate to, and what to do if the job already has an assignment or booking.
The example shown later uses John Smith, the existing Morning window, and the next Monday–Friday, including public holidays. Jobs with existing assignments are left alone. These are choices for this example, not built-in toolkit settings.
Creating this Codex project does not deploy or activate anything in ServiceM8.
4. Let Codex prepare the Add-on
Codex should check Node.js and npm, install the official toolkit, create the Add-on files and build the agreed behaviour.
You may see a Terminal permission card with Allow once and Deny buttons. Read the explanation and check that it matches the step you are completing. If it does, choose Allow once so Codex can run that command. You normally do not need to copy it into a separate terminal.
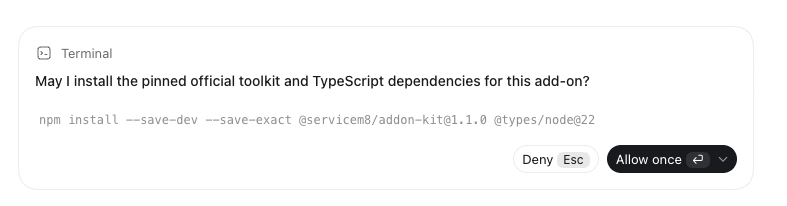
Codex asks permission to install the toolkit. Review the request, then choose Allow once.
Codex should explain any additional service or hosting your idea needs. ServiceM8 hosts supported Add-on functions, but an idea that depends on another service may also need that service's account or configuration.
5. Connect your ServiceM8 test account
Codex may already have a saved ServiceM8 connection. Have it check which account is connected first, and explain whether a new login or additional permissions are needed.
When Codex is ready to connect, it should start the toolkit's browser login with the access your Add-on needs. Codex should also include those data permissions in the Add-on configuration; permission to manage Add-ons alone does not grant access to jobs or other account data. Version 1.1.0 supports this flow without asking you to paste an API key into the conversation.
Sign in to the intended ServiceM8 test account in the browser. You should then see a green ServiceM8 authorization screen naming ServiceM8 Addon Kit.
This is the toolkit requesting access to manage your Add-on and use the account data required for your feature. The permission list depends on your Add-on. For example, allocation requires access to jobs, staff and scheduling.
Review the requested access and click Allow to continue.
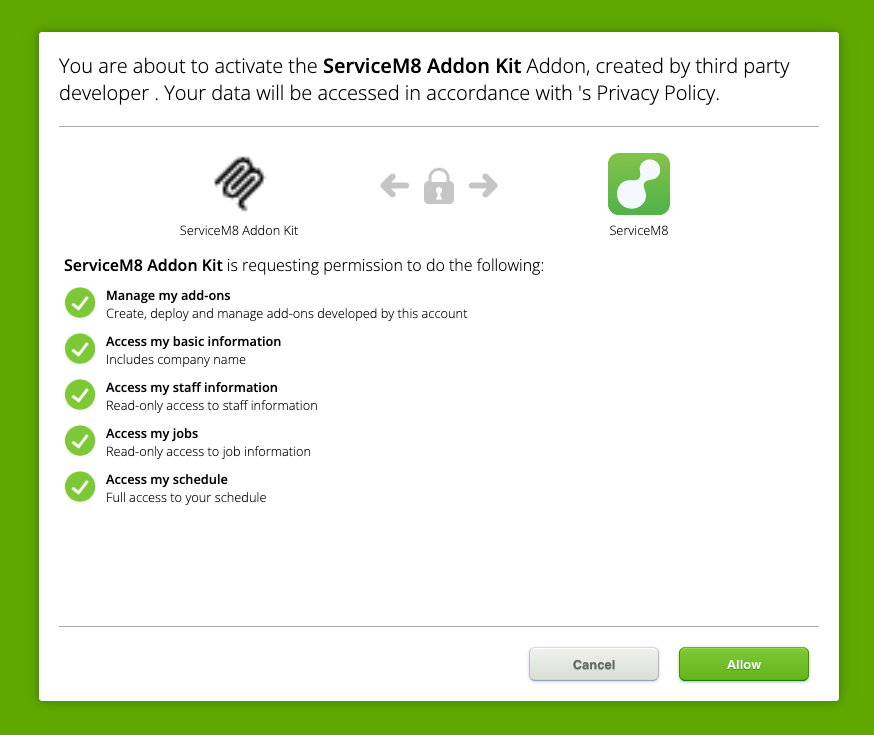
Review the access requested by ServiceM8 Addon Kit, then select Allow.
When you see “You're logged in”, close that browser tab and return to Codex, where the toolkit is running.
Login is complete. Close this tab and return to Codex.
Codex should check the connected account and permissions, then ask you to confirm the business before deployment. For the allocation example, it should also confirm John Smith and the Morning window.
If it identifies the wrong account, tell it to switch accounts before proceeding. Signing into another ServiceM8 account in a browser alone does not necessarily change the toolkit's saved connection.
The toolkit stores its login credentials outside the Add-on project. Enter passwords only on ServiceM8's login page; do not paste passwords, API keys or secrets into the conversation.
If Codex later opens ServiceM8 inside its own browser, you may need to sign in there too. That browser may use a separate profile from your normal browser, so this does not by itself indicate a failed toolkit login.
6. Check the build and approve deployment
Before deployment, Codex should test the agreed behaviour and run the toolkit's dry run. A dry run checks the configuration and bundles the code; it does not install the Add-on or prove that a live job will be processed correctly.
Ask Codex to summarize:
- What the Add-on will do, including when it should leave existing data alone.
- Which ServiceM8 account it will affect.
- What passed locally and what still needs a live test.
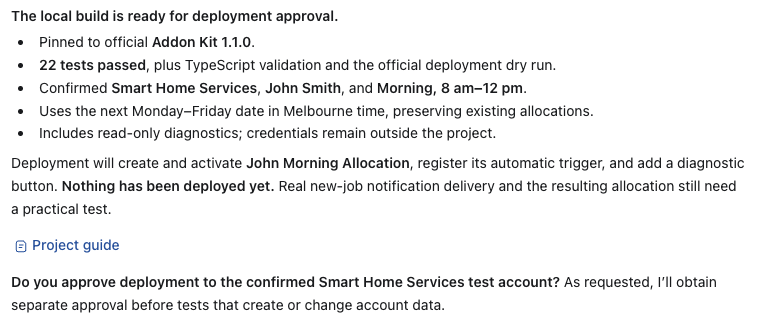
Review Codex's build summary and request for deployment approval.
Once those details are correct, approve deployment. Deployment normally activates the Add-on immediately, so an automation may begin responding to events in that account. Codex should wait for deployment completion and retain its identifier for troubleshooting.
If deployment fails or its status is unclear, let Codex investigate before starting another deployment. A local test result or an upload-in-progress message is not deployment completion.
7. Find your Add-on and test it
In ServiceM8 Online, open Account → Developer → Store Items and locate your Add-on.
Your private Add-on may show Draft under Approval Status. This refers to Store approval, not whether the private Add-on has been deployed. You do not need to submit it to the public Store to use it in your account.
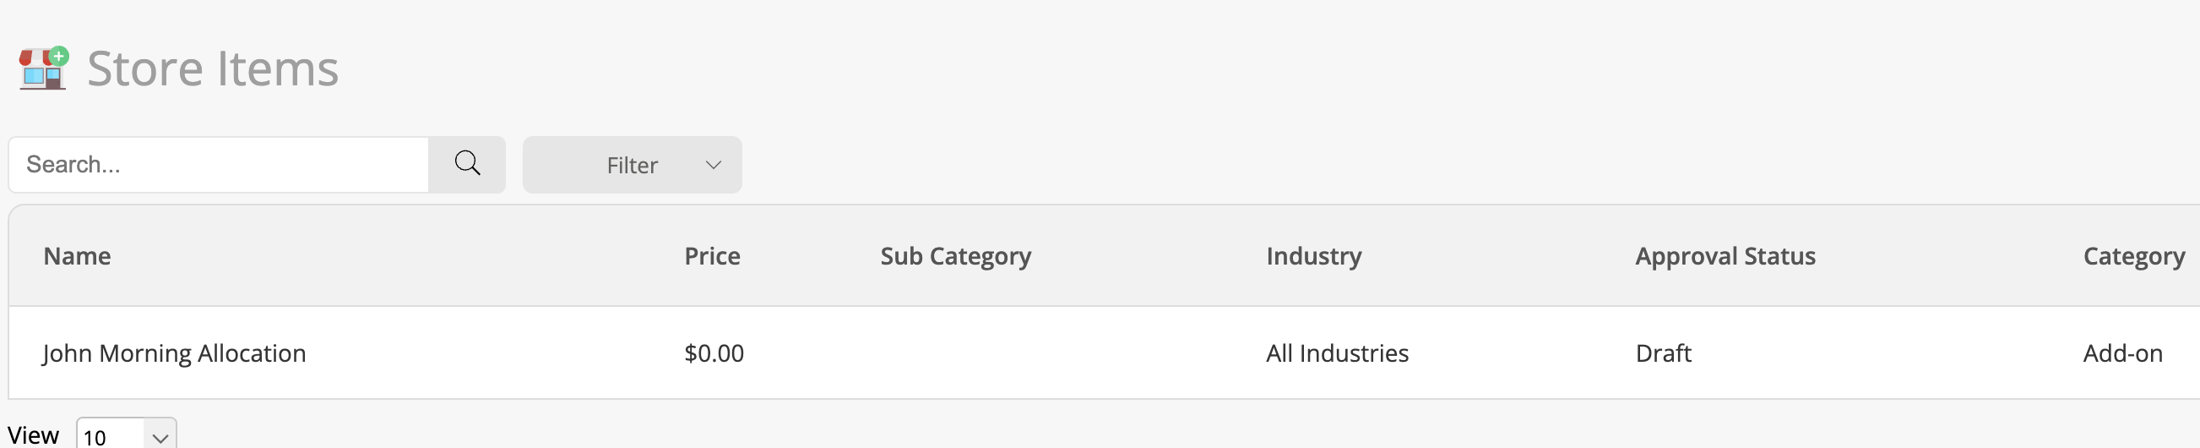
John Morning Allocation appears in Store Items. Draft is its Store approval status.
Agree on a small practical test with Codex. Approve any test that creates or changes account records before it runs.
For the allocation example:
- Create an agreed new, unassigned job in ServiceM8 Online and save it.
- Give Codex the job number and allow time for the automatic notification to be processed.
- Open the job and check Upcoming Bookings and its diary.
- Confirm the staff member, Morning window and intended date. Check that the diary attributes the allocation to the Add-on.
- Have Codex verify that the saved allocation matches the agreed rules and that its duplicate checks pass.

The job diary shows John Morning Allocation allocated Job #1735 to John in the Morning window on 16 September 2026.
This example tests a job created in ServiceM8 Online. If your business also creates jobs through the mobile app, an integration, imports or another route, have Codex check and test those routes before relying on the automation for them.
If the expected result does not appear, tell Codex the job number, how you created it and what you see. Continue in the same project and have it investigate before creating more test jobs. Deployment success, a successful manual check and working automatic allocation are different milestones.
Once the supported hosted function is deployed, ServiceM8 runs it when triggered; your computer does not need to stay on for that function to run. Keep any additional external-service requirements Codex identified in your handover notes.
8. Make changes later
Return to the same Codex project and folder, describe the change, and repeat the build checks, deployment approval and practical test.
Have Codex preserve the Add-on's slug in addon.jsonc when updating it. Changing the slug creates a separate Add-on instead of updating the existing one. Ask for a short handover identifying the account, project folder, Add-on version, deployment identifier and verified behaviour.
If you need to stop an automation, ask Codex to identify and explain the supported deactivation steps before making changes. Closing Codex does not stop a deployed hosted function.
For commands, configuration and authentication details, see the Addon Kit reference.
Support and troubleshooting
Building your own Add-on with Addon Kit is a self-service experience. This documentation and your AI coding assistant can help you get started, but you'll need to manage setup, development, testing, maintenance and troubleshooting yourself. ServiceM8 Support isn't able to provide how-to guidance or troubleshoot issues with the toolkit, your workflow or custom Add-ons.
If you'd like to share ideas or ask the community a question, try the Developer section of the ServiceM8 Community. Please keep in mind that replies and solutions aren't guaranteed.
Before posting, use made-up example data and remove passwords, API keys, tokens, account identifiers, customer or staff details, and other sensitive information from any text, code, logs or screenshots. Review any post drafted by an AI assistant before sharing it.
Updated 17 days ago